
Have you seen those long running to do list style weeklies on social media and wondered how they were used? I’ll explain how I use mine and why I love it.
This post may contain affiliate links. Please see my Disclosure for more information.
I’m constantly trying to increase my productivity.
As a work-from-home mom with one kid in school and the other terrorizing all corners of the house 15 hours per day, staying productive is crucial.
After a lot of research and trial and error, I have found a few ways to improve my productivity. I use Eat the Frog method, where you write down all of your tasks for the day and then complete the biggest or most unpleasant task first.
For example, each week on cleaning day, I get all of my cleaning done first thing in the morning. Like most people, I hate scrubbing toilets and soap scum out of the bathtub. So, I get it done early knowing I will be able to focus on my other tasks.
Another productivity technique I use is the Pomodoro technique. With this method, you set a Pomodoro timer for 25 minutes and work on a designated task for that amount of time. After the timer goes off, take a small five-minute break and then go back to your task, interupption free.
However, even with the above methods, I have encountered one issue that none of them address.
If I’m only writing out my tasks each day, I forget certain tasks or end up having a day that is overwhelmingly full of tasks and my week isn’t balanced.
Bring forth the running to do list or running task list. About a month ago, I added my first running to do list to my weekly spread in my bullet journal. And since that first week, it’s now become a must-have in my weekly bullet journal setup.
The running to do list is a simple addition to your bullet journal or planner that can improve your productivity, create balance in your week, and reduce stress surrounding your weekly schedule.

How to Create a Running To-Do List
A running to do list is likely one of the easiest components to create in your bullet journal. You don’t need any fancy supplies or creative abilities.
For this you will need:
- A black fineline pen
- A ruler (I really like using this 6″ cork-backed one)
The hardest part about this list is deciding how long you will need to make your list. I usually go with about half a page high, but you may want to consider the entire height of the page if you have a lot of tasks.
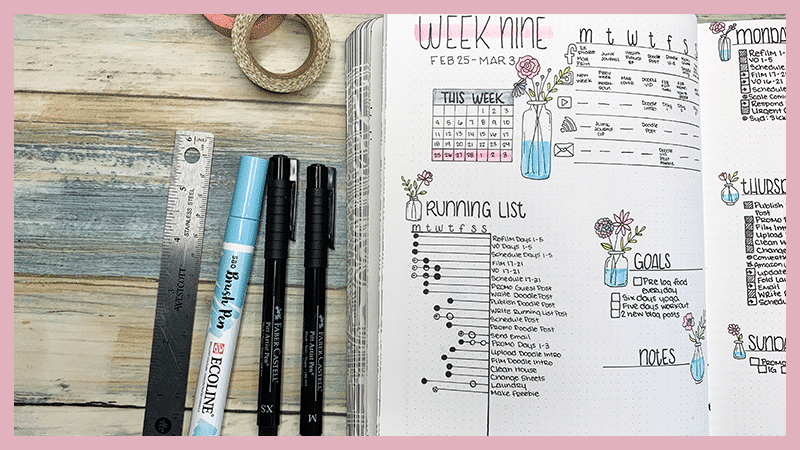
First, draw a horizontal line extending from the edge of the page that is 7 boxes wide. One box for each day of the week.
From here, draw a vertical line connecting to the farthest point of your horizontal line all the way to the bottom of the page. You can turn this into a box if you prefer.

Along the horizontal line, write in the first letter of days of the week (Ex: M, T, W, T, F, S, S).
Now, all that is left to do is fill in your running task list.
To do this, start listing out all of the tasks you want to accomplish in the given week along the side of the box you created, not inside it. This can include work related tasks, housekeeping, grocery shopping, fitness related tasks, etc.
It’s okay if you have some rows left over. You might end up adding a few tasks as the week progresses.
How to Use Your Running To Do List
After you have created your running task list in your bullet journal and added all of your tasks for the week, it’s time to make the most of your list.
Look over your list briefly to get a general idea of what needs to be done. Perhaps certain tasks can be accomplished at the same time.
Next, starting with the top task on your list, make an open circle within the box corresponding with the day you want to accomplish the task. Then draw a horizontal line from the circle to the task.

Continue ‘scheduling’ each task to a specific day until you have scheduled every task on your list.
Now, throughout the week as you accomplish your to do list, color in the circles corresponding with the specific tasks.
What If You Don’t Accomplish a Task?
Initially, this is what turned me off about the running task list the most. I didn’t want to schedule myself to strictly and then not be able to stick with my schedule.
But, If your week doesn’t go exactly as planned, don’t fret. This is easily remedied.

Simply draw an arrow in the circle corresponding the task you didn’t complete and then draw a circle on the same line for the following day. This is very similar to migrating a task in your standard weekly log.
Not sure what kind of bullet journal weekly layout works best for you? Check out this post to find your bullet journal weekly style.
If you cancel a task, simply mark an X through the circle that corresponds with the given task.
Tips to Make Your Running To Do List More Effective:
- Clump similar tasks together on the same day. For example, if you have laundry, change bedding, and wash curtains on your list, scheduling them all on one day may make it easier.
- When you are writing out your task list, write similar tasks next to one another. This makes it visually easier to see and plan for those tasks.
- Eventually, you may want to try to write your list chronologically. This takes a bit more time and pre-planning, but visually it can be much more efficient.
Will you be trying to use the running task list method in your bullet journal? What other hacks do you have to keep your week organized and productive?
Let me know in the comments below.
Don’t have time to read the whole post? Pin the image below to your favorite Bullet Journal board on Pinterest.

