
Are you as obsessed with florals as I am? Here are 11 Simple Step-by-Step Floral Doodles you can start drawing right now. Make a card, add them to your bullet journal, or simply spend 30 minutes doodling freely.
 *This post may contain affiliate links. Please see my Disclosure for more information.
If you follow me on Instagram, you might have picked up on the fact that I have a major obsession with floral doodles. I especially love monochromatic florals. They add a very simple and delicate creative touch to my bullet journal pages. And, I’ve also used them to make ‘Thank You’ and ‘Get Well Soon’ cards. I’m kind of winning at best relative of the year award
The most wonderful thing about florals is that you can create your own. There is an unlimited number of flower and leaf combinations. Plus, after you have the basic florals down, you can move onto drawing wreaths, borders, etc. Are you as enthusiastic as me, yet?
11 Simple Step-by-Step Floral Doodles
While the options are endless, I wanted to share 11 of my favorite and most used floral doodles in this step-by-step post. Feel free to replicate these exactly or put your own twist on them. And if you do use them or create a spread with them, I would love to see your work. If you’re on Instagram, upload a picture and use the hashtag #thepetiteplanner.
SUPPLIES
- Pencil
- Eraser
- Black Fineline Pen (I use these
)
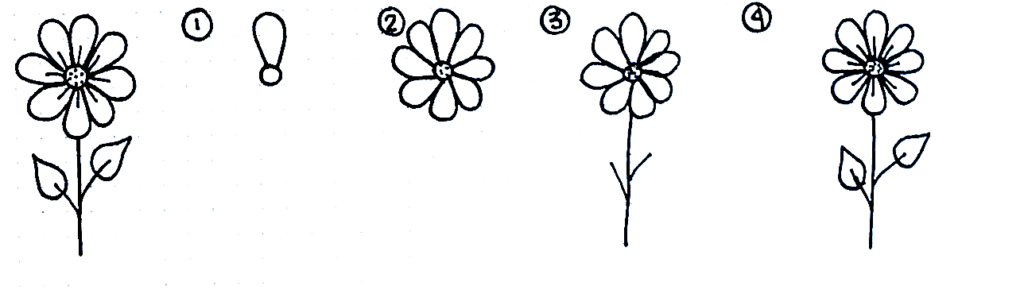
1). Simple Flower
This flower is probably one of the most common floral doodles. I started drawing flowers similar to this when I was in elementary. Granted, they are much more refined now. Start with small circle and then add oval like petals around the outside of the circle. Add a stem, a few leaves, and the interior lines on the petals for a finishing touch.
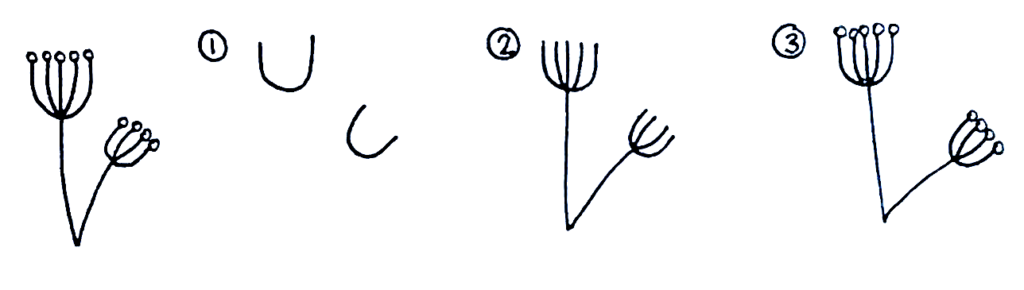
2).Dandelion
This is a super fun and simple addition to any garden scene. Start by drawing two U shapes, one larger than the other. Then, draw three additional lines inside the larger U shape, and two additional lines inside the smaller U shape. Add some small circles to the top of the lines you just drew. Lastly, draw two stems that connect at the bottom.
3). Daisy
These upwards facing daisy flowers are some of my favorite flowers to draw. Start with a half circle shape, with the flat side facing down. Then, make the same shape but angled the other way. Draw thin oval-shaped petals coming out the bottom of both half circles. Then, draw two stems extending down from the flowers and add a few leaves to the stems.

4). Rose with Stem
Start by drawing a spiral, bringing the tail straight down a short way. Then, draw an angled teardrop-shaped petal that touches the side of the spiral. Mirror that shape horizontally. Add some jagged petals behind the spiral. And then, add a stem, leaves, and some small thorns.

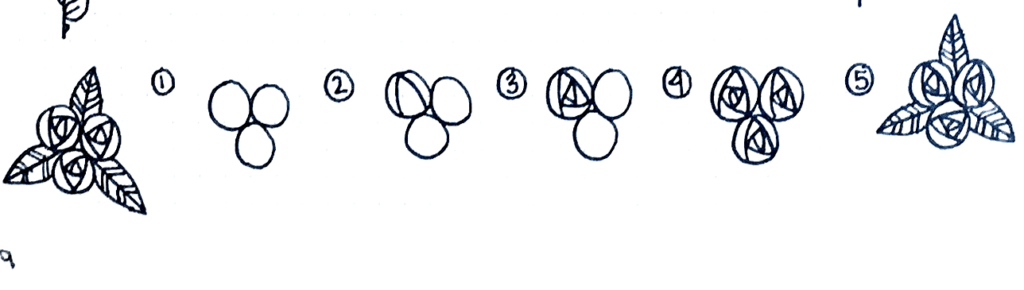
5). Rose Bouquet
Draw three small circles, all touching side. They will form a triangle shape. Then, within the circles create a spiral pattern, starting from the edge of the circle and spiraling in. Repeat this for the other two circles. Last, add a few leaves to your bouquet.
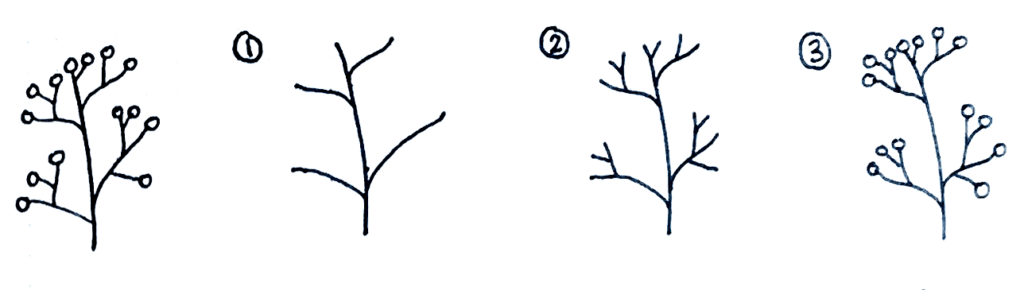
6). Berry Bush
Draw a vertical line with some angled branches coming off. Next, draw small branches coming off the main branches you previously drew. When you are happy with the number of extending branches you have, draw some round berries on the ends of your branches.
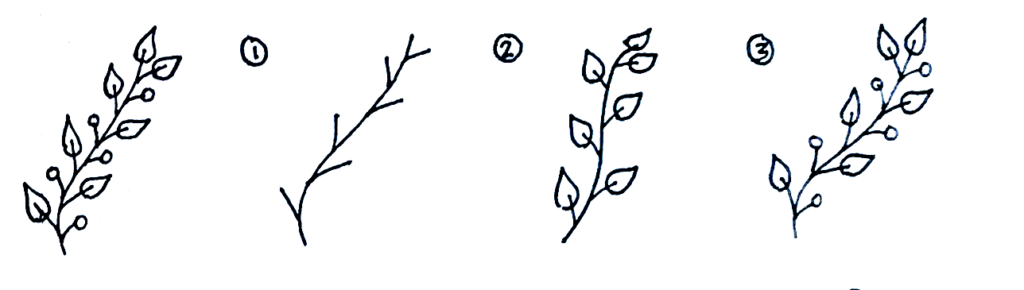
7). Leaf & Berry Vine
This floral vine is a great addition to a wreath doodle. Start by drawing a curved line. Then, add equally spaced small branches on each side of the vine. Next, draw your leaves, attaching them to the small branches you just drew. Last, add your berries between the leaves.
8). Leafy Stem
This is another of my favorites. Draw a slightly curved line. Now, to draw you leaves, make teardrop-shapes, with the pointy side touching the stem. As you move up the stem, make your leaves smaller and smaller. Finally, add a short vein line to the inside of each leaf.

9). Abstract Stem
This is a great filler stem for slim areas where a flower or wider vine won’t fit. Start by drawing a small circle, then leave a little space below it and draw a slightly bigger circle. Continue this pattern until you have 4-5 circles, increasing in size as they go down. Now, draw lines connecting each circle together. On the bottom circle, draw the line longer to create a tall stem. Then, add curved lines to the inside of each circle.

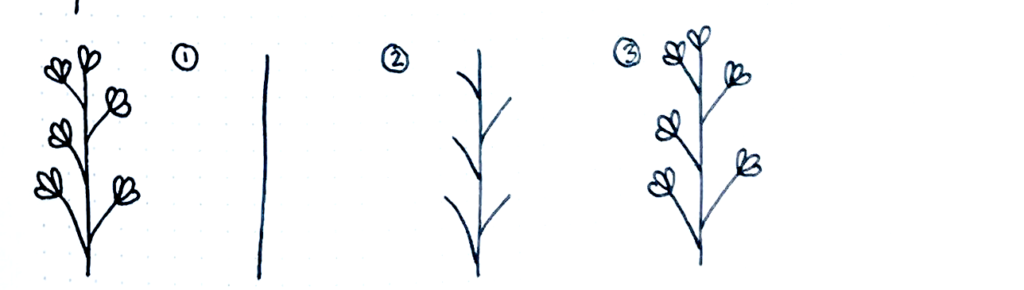
10). Stem with Flower Buds
To begin this floral doodle, draw a vertical line. Now, add a few short branches angling up on each side of the line you just drew. To add the floral buds, start by drawing one very small teardrop shape on the end of a branch. Then add two more of the same shape to each side of the first teardrop shape. Now, repeat this flower bud on the end of each branch.
11). Simple Decorative Leaves
Start by drawing a V shape for the two stems. Next, draw your leaf shapes directly over the two stems, leaving a short stem at the bottom of each leaf and connecting the tip of the leaf to the top of the stem line. The last step is to add vein lines to the inside of both leaves. Space your veins apart as you like, but keep both sides of the leaf symmetrical.

The Next Step in Your Doodle Journey
Are you ready to take the next step in your doodle journey? I have three options for you:
You can head over to this post and learn how to draw a simple floral wreath.
You could head over to Skillshare and check out this amazing floral doodle course by Peggy Dean, the creator of The Ultimate Brush Lettering Guide


Or, you could invest in yourself and your creativity and go enroll in my E-Course, Rock Your Journal.
This course is packed full of content, from creative confidence building to doodle basics, faux-calligraphy, shadow lettering, banners and headers, floral compositions, and so much more. Plus, you’ll get to join our Facebook community full of talented, encouraging, and supportive students. And, the learning doesn’t stop when you finish the course. Every week, I go Live in the group with a new tutorial in lettering, doodling, creative layouts, and more.
Because you stuck it out and read through this entire post, I want to offer you a discount code to use when you enroll. At checkout, use code: INVEST5 to save $5 on enrollment. This course offers lifetime access, a 30-day money back guarantee, and all the resources you need to take your journal to its full potential.
Ready to Enroll? Click Here!

