
*This post may contain affiliate links. Please see my Disclosure for more information.
I recently finished my Bullet Journal 2.0 Blog Series — if you haven’t read it, go bookmark it and read through it when you get a chance. Anyhow, I had such amazing responses that I’ve had a bit of separation anxiety. I want a weekly “series”, if you will, to keep up with.
Two Page Weekly Spread Tutorial
I started The Petite Planner blog because I love the bullet journal system and it has helped me gather and prioritize my life. It’s helped me set and stick to goals. And mostly, I knew that it could help other people too. But, what I didn’t know at the time was that the system can be intimidating to newcomers. The artistry posted on social media turns people off and makes them feel like they can’t use the system. If this is you, STOP!
You can use the system!
One of my ultimate goals for this blog is to make people more comfortable with using a bullet journal and setting it up so it suits their needs. A lot of people will tell you to stick to a minimalistic bullet journal if you are intimidated. While I think it’s of the most important to grasp the basics of the system, I also think you should be artistic if it’s something you’re passionate about. Long story short, I want to show people who are intimidated by more complex spreads how to make their own. So, my plan is to regularly add these tutorials for weekly, monthly, and collection setups here on The Petite Planner.
If this is something you would enjoy, subscribe to my newsletter to keep up with these tutorials and receive updates when new printables are added to the VIP Resource Library.
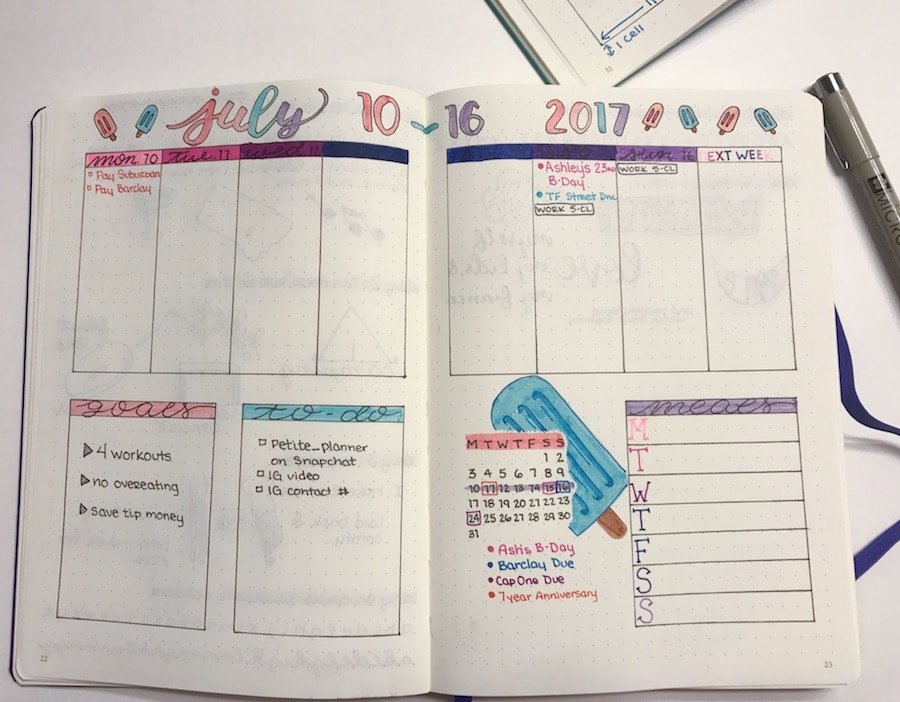
This spread is one I use fairly regularly. It’s quick to set up and can be customized with doodles, fun headers, and colors. This weekly spread tutorial is done in an A5 Leuchtturm1917
Supplies Used
- A5 Leuchtturm1917
- Black Pigma Micron 02
- 12″ Ruler
- Stabilo Point 88
(optional)
- Crayola SuperTips
(optional)


How to Make Your Weekly Spread
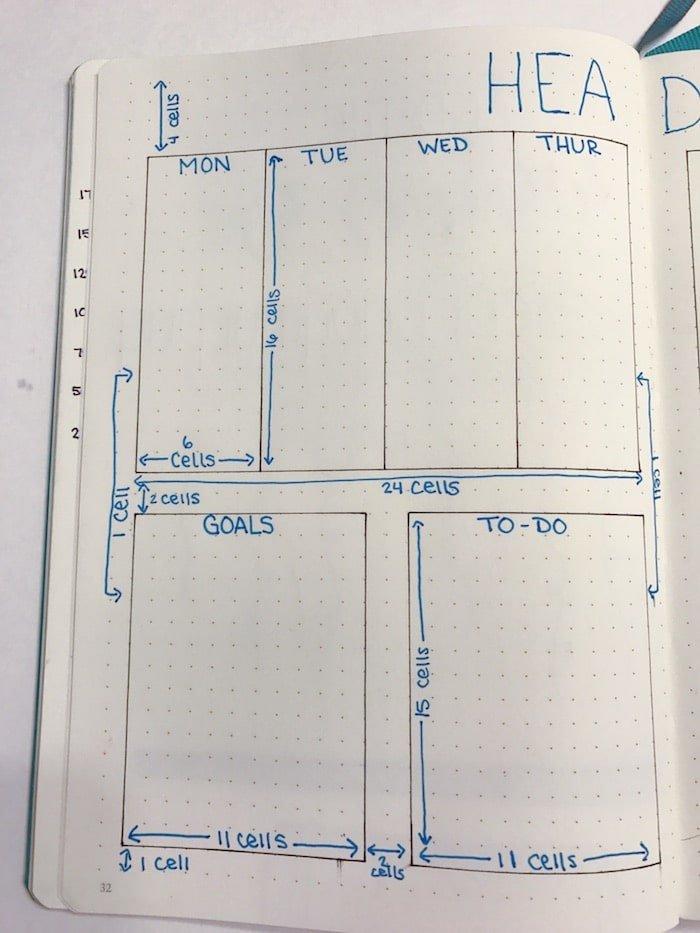
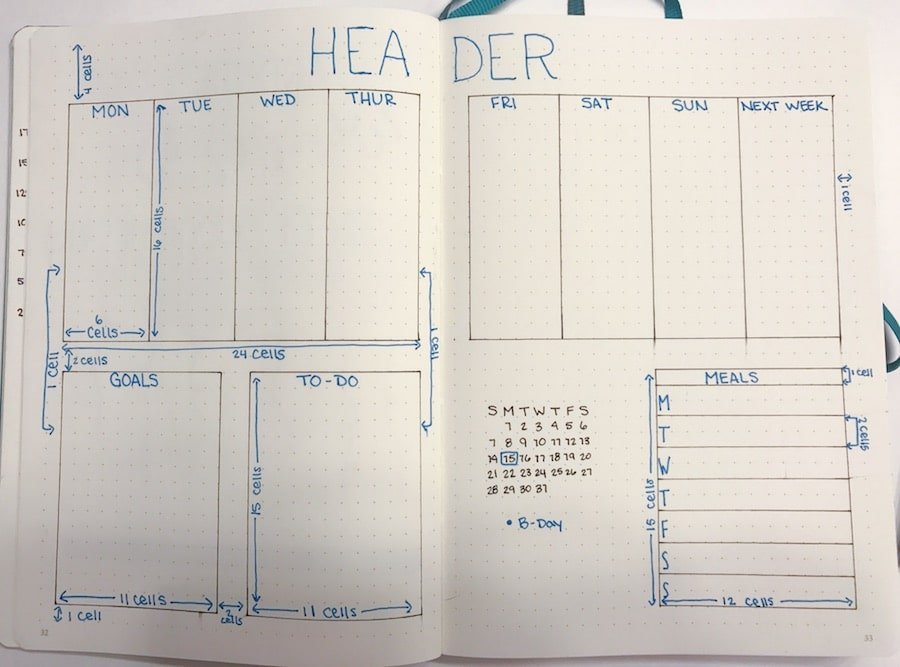
Step 1: Starting at the top of the page, skip down 4 cells. From the edge of the page, skip over 1 cell. You are going to draw a large rectangle for your weekly schedule. The dimensions of this rectangle will be 24X16 cells. Be sure to leave 1 cell open on both edges of the page.
Step 2: Within the rectangle you just created, you are going to draw in some dividing lines. Starting at the left side of the page, count over 6 cells and draw a vertical line. Repeat this two more times. You will have 4 vertical rectangles within your larger rectangle.
Step 3: Repeat steps 2 & 3 on the adjacent page.
**There are 8 total rectangles. Seven of them are designated for days of the week. The remaining rectangle is a place to put notes and reminders for the following week.
Step 4: From the bottom of your large rectangle on the left page, measure down 2 cells. Still leaving 1 cell open on the left edge, draw another rectangle with dimensions of 11X15 cells. This area is designed for your weekly goals.
Step 5: From the right-hand side of the rectangle you just drew, measure two cells over and create an identical rectangle. This will be your to-do list for general tasks.
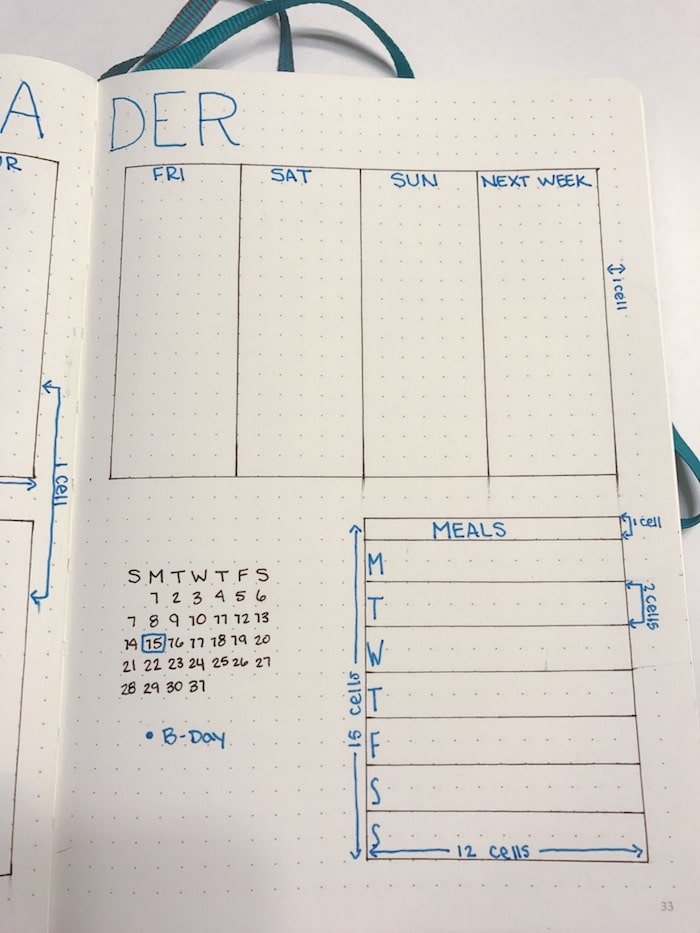
Step 6: Move to the adjacent page. From the bottom of the weekly schedule box, measure down 5 cells. Then, from the left side of the page, measure over 3 cells. Here you are going to insert a mini-calendar of the current month. I use this space to note any important dates in the month so I can keep them fresh in my mind.
Step 7: On the same page as your mini-calendar, start from the right side of the page. Measure over 1 cell, and 2 cells down from the weekly schedule. Draw a 12×15 cell box. It should line up with two of the above boxes labeled “Sunday” and “Next Week”. Now, draw a horizontal line within the box, 1 cell down from the top. This is the header of the box, which is specified for daily meals. Next, measure down 2 cells and draw another line in the box. Continue making horizontal lines every 2 cells until you reach the bottom of the box. You will have a 1 cell high space for your header and then seven 2 cell spaces. Label the spaces with the days of the week. Essentially you are done at this point, but you can add doodles, washi tape, or headers at this point.
Final Tips
- You can replace headers of the bottom boxes with whatever suits your lifestyle. Maybe you could add a workout plan, a work schedule, a cleaning routine, etc. The sections I added (goals, to-do, meals) are what I use and are very general. But don’t be afraid to personalize this spread.
- Play around with your header. It doesn’t need to be smack in the middle. Use some fun markers
, or watercolor
to add color to this page.
- I left 1 cell on all the edges open because it fits nicely, but you can add washi tape the edges of this spread without messing it up or covering anything. PS: if you have a washi addiction, check out this Etsy shop!
I reallllly hope you guys enjoyed this and found it useful. I’m not 100% certain I’m the best at instructions, but I promise I’ll get better. If you have any suggestions, feel free to shoot me an email or a message on Facebook. I’m always open to your input.

