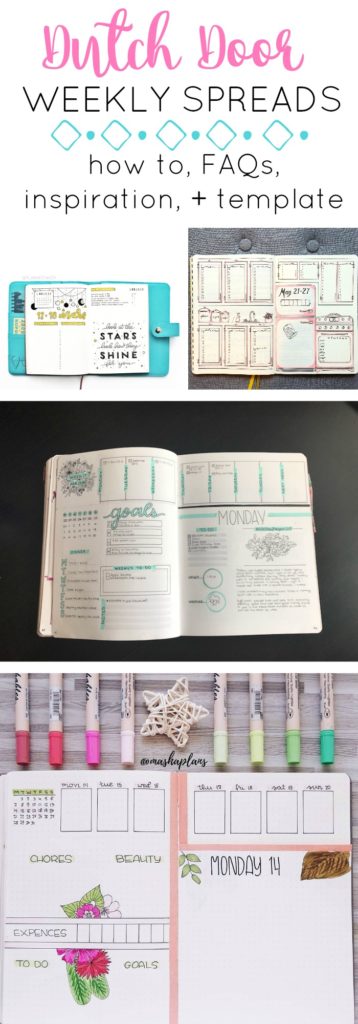
If you’ve spent a good amount of time on Instagram, browsing the bullet journal hashtags and accounts, you may have seen a few dutch door weekly spreads. In this post, I will teach you how to create one, how to use it, why it’s effective, and show you some ideas for inspiration.
 *This post may contain affiliate links. Please see my Disclosure for more information.
Dutch door weekly spreads are not a new trend. Although, they are growing in popularity on Instagram and Pinterest. For one, they are aesthetically pleasing. But, they can also be very effective. For a long time, I used a fairly standard weekly spread with all of my days spread across two adjacent pages. You can see some of my favorite weekly spreads here.
But, I always felt like I was missing something. Like I had more to say or do. Turns out, this was very true and I needed more space each day for writing. And while dailies were an option, I love having a weekly overview where I can see my entire week in one place. Alas, dutch door weekly spreads.
In this post, I’ll teach you how to make a dutch door spread, how to use it, why it’s effective, and show you some ideas for inspiration. PLUS, at the end of this post, you can download the Free Dutch Door Template that will help you layout and cut your dutch door spread.
How to Make Dutch Door Weekly Spreads
You can read through the following direction, or scroll down to view the video tutorial. There is more than one way to make a dutch door spread, so this is just the baseline. Feel free to come up with your own layout and divide your pages as you see fit.
Supplies:
- Your journal
- A ruler
- A pencil
- Sharp scissors
- Your choice of pens and markers
Directions:
- Start by flipping your journal to an open 2-page spread. Use your pencil to label the left page title. Om the left page, write Monday/Sunday (whichever day you start your week on) in the middle of the page. Then continue to label each page after that with the days of the week. This is how I ensure I don’t cut too many pages. If you have one day per page, you should have a total of 8 pages (1 per side), including the title page.
- Decide how big you want your weekly overview to be. I usually make mine about 1.5-2″ tall, stretching across the top of both pages. Once you have decided, take your ruler and draw a horizontal line on the Monday Page where you want to cut. Note: you’ll be cutting off the top of your pages and within that space will be where your weekly overview is. So, keep in mind how much space you need.
- Next, grab pages Monday-Saturday. You won’t be cutting the Title Page or the Sunday Page. Holding Monday-Saturday together, carefully cut along the horizontal line you drew. Cut all the way to the spine of your bullet journal. Now, rotate your journal and carefully cut those same pages along the spine to remove the top portion of the pages.
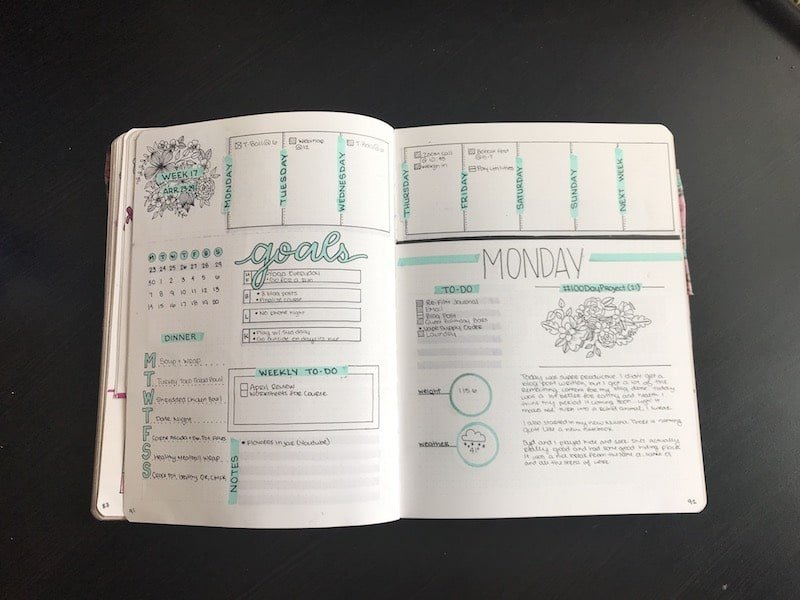
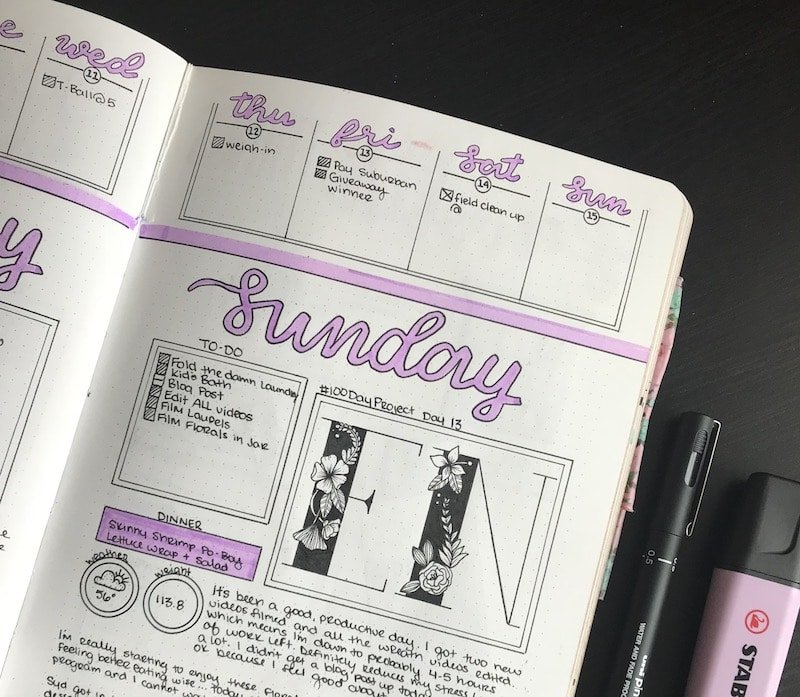
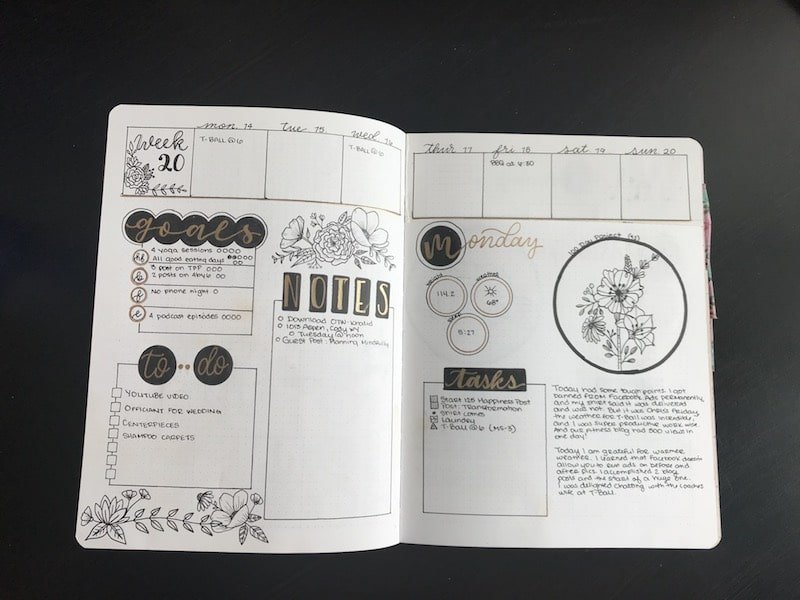
- Now you can start drawing out your weekly overview in the space that is revealed once you have cut out your pages. Your weekly overview will stretch across from the top of your Title Page to the top of your Sunday Page but will be visible at all times. Depending on the size notebook you are using will determine how wide each day will be. I divided mine into 4 boxes per page. One box for each day of the week, and one box left over for the title of my weekly. Ex: Week 20.
- After you have your weekly overview drawn in, you can start filling in your Title Page with any trackers, lists, etc. that apply to the entire week. I usually have a Goals section, a general to-do list, and a notes section. But you can have habit trackers, sleep trackers, quotes, etc.
- Then, you can start adding the daily titles to your half pages. Erase the penciled in days while as you add your daily headers. Within each daily page, you can add additional boxes and trackers, as well. We will go over that in an upcoming section.
Video Tutorial
How to Use the Dutch Door Spread
There are unlimited numbers of ways to use a dutch door weekly spread. From habit tracking to doodle space and daily positive affirmation to meal and workout planning. The purpose of the dutch door spread is to provide maximum daily space, while still offering the convenience of a weekly spread.
How to Use the Weekly Overview
Events and Appointments
Unlike a traditional weekly spread where you would have more room, the weekly overview in a dutch door spread is much smaller. Therefore, the most efficient way to use this space is for big tasks, events, work schedules, bills, etc. Your daily to-do list, like laundry, go to the grocery store, etc. should go in your daily pages, below. And then use your weekly overview to keep track of more important events and tasks.
Meal/Workout Planner
Another use of the weekly overview is to keep a meal or workout tracker. You can write in all of your meals or workouts the weekend before. And then, as the week passes you will be able to glance up and see upcoming meals or workouts.
How to Use the Title Page
The title page serves as your bonus space. You can fill it up with any number of options from the list below, or from your own ideas. The below list is not a list of rules, but rather ideas to get your started. Make your title page relevant to your life and your goals. This may take some trial and error. Try out things you think will work, and if they don’t, you can always change it the next week.

Weekly Goals
I love having a place for my weekly goals. I often divide them into categories such as health and fitness, blog and business, family, and creative. This allows me to focus my energy on specific tasks that will help me accomplish these small goals. And in turn, these weekly goals are small steps towards my much bigger long-term goals.
Notes
I like to have a notes section on my weekly pages. It gives me the space to write down ideas, questions, inspiration, songs I want to download, etc. Then I usually flip back through these pages at the end of the month to see what still applies. From there I can turn those notes into tasks, add them to a list, or remove them completely.
Weekly To-Do List
This is a list of things I want to accomplish throughout the week that aren’t date specific. For instance, recently I knew I wanted to shampoo my carpets, but wasn’t sure what day would work best. I add this task to my weekly to-do list and then migrate it to my daily list when it becomes applicable.
Weekly Quote
Sometimes I like to have a weekly quote that serves as the theme or focus of my week. This allows me to focus in on my goals, stay positive and it gives me some practice with lettering. You can also take your quotes and add doodles to them to add a touch of decoration and improve your doodling skills.
Mini Calendar
A mini calendar to can help you have an overview of your month. Highlight the current week and then you can see upcoming dates and, if you choose, write in next week’s events and appointments below the calendar.
How to Use the Daily Pages
There are just as many options for your daily pages as there are for the title page. I’ll give you examples of how I use mine along with a few others to get you started.
Daily To-Do List
This is the most obvious option for filling in some space in your daily spreads. This is where you will keep your daily task list of things like household chores, work-related tasks, errands, etc. You could migrate your big events and appointments to, from the weekly overview above.
Daily Goals
Some people like to set daily goals. These might be something like run 3 miles or drink 8 glasses of water. This doesn’t pertain to everyone and not everyone will have a need for daily goals. But if breaking your weekly goals down into smaller more manageable goals works for you, this is a great option.
Daily Doodle
What I have been doing lately, as part of the #100DayProject, is including my doodles space in my daily pages. Once the #100DayProject is over, I may replace this space with something else or keep going with a daily doodle. You could do this and join a doodle challenge, like the one I host on Instagram every month called Oodles of Doodles.
Weather Tracker
I like to keep track of the weather every day with a small doodle and the high temperature. This may come in handy for the following year if you want to look back and see the average temperature. It’s also a fun way to possibly correlate the weather with productivity, activity, or mood.
Weight Tracker
Again, this may only apply to a small number of people. I like to weigh myself every single day. While some consider this counterproductive, for me it creates accountability and allows me to see a trend– as I’m a woman, and certain times of the month affect my weight more than others.
Sleep Tracker
I use an app called Sleep Cycle on my phone to track the time that I sleep, as well as my sleep quality. Then, I write those numbers in my journal. Like the weather and weight tracker, looking back at my sleep habits helps me see trends between the number of hours I sleep and how productive I am.
Journal Entry
This is the number one reason I started using the dutch door weekly spreads. I wanted the room to journal every day. The space needed for this will depend on what you want to journal about or how long your journal entries typically are. I played around with mine and have finally found a decent amount of room that allows me to write what I want without being too much.
Medication Tracker
If you take a number of medications daily, having a medication tracker may help to keep track of what you take and when you take it. This can relieve some of the anxiety of wondering if and when you took a certain pill.
Habit Tracker
While many people prefer to leave these for weekly or monthly spreads, you may opt for a daily habit tracker if you like to change the habits you are tracking regularly, or you have different habits for different days of the week. This is somewhat similar to having a goals tracker.
Productivity Tracker
I recently started adding a productivity tracker to my daily spreads. It consists of a small rectangle that is five boxes long. I add little dashes inside the rectangle so that I can rate my daily productivity on a scale of 1-5. This helps me stay accountable. If I have a day where I rate myself a 1 out of 5, I am likely to work harder the next day to get more accomplished.
Positive Affirmation
Have you tried adding positive affirmations in your journal? If you want to become more positive, are working to change your mindset, or just looking to achieve your goals without getting stressed out, you should try using positive affirmations. You only need a small space to write one sentence every day.
Work/Study Schedule
Having a work or study schedule can be beneficial if you have a hectic or irregular schedule. It may also help you plan out the rest of your day so that you aren’t overlapping events and appointments.

Why Dutch Door Weeklies are Effective
Dutch door weekly spreads offer a number of benefits. The most prominent being that they provide you with a lot of space to plan and organize your days, while also allowing you to see a complete overview of your week.
The other benefit is that they are incredibly customizable. You can make the weekly overview larger or smaller depending on how big you want your daily pages to be. You can also add two days to a single page instead of just one. This saves space and may be less intimidating to someone who is just starting to use daily pages.
The added space also allows you to be more creative with your daily headers, banners, decorations, and doodles. So, if you’ve been wanting space to practice your doodling, lettering or patterns, a dutch door spread may be a good option for you. If you’re scared of messing up, the good news is that you’ll be turning the page every two days, so you won’t have to look at it long if you aren’t happy with it.
Also, the added space allows you to really figure out what your needs are and what works best for you. Maybe you will find that you need a little less or a little more room each day. Maybe you will discover that you like to keep track of your sleep cycle or how you feel after a workout.
The Cons of a Dutch Door Spread
There are a couple drawbacks that I want to discuss before getting into the FAQs. Dutch door weekly spreads take a lot longer to set up than a traditional weekly spread. Because you have to create a weekly overview and daily spreads, this is an added amount of work and time.
The other drawback is that it can make your pages uneven. You’re cutting out chunks of paper from your journal. Any paper that lays over that area is going to have a slight ridge. To remedy this, I change up where I put my weekly overview. One week I will put it on the top of my page and the next I will put it on the bottom. While this doesn’t completely negate the dip where you have cut out pages, it does help keep things a little more balanced.
FAQs
 How long does it take to set up a dutch door weekly spread? I would say in total, a couple hours. Granted, my pages are typically decorated with colors, added line work, and sometimes floral designs. Going with a minimalistic spread may reduce this time to about an hour.
Do you do all the pages ahead of time? This is a personal preference. I don’t typically create all of my pages ahead of time. I typically create each daily page the night before. But, if you prefer to have it all set up ahead of time then you can do that as well.
Do I need any special supplies? I highly recommend a good pair of sharp scissors. Cutting along the spine of your notebook can be not only a little frightening, but difficult. I use a sharp pair of embroidery scissors because they have a very sharp, needle-like point and are a bit more precise than a big bulky pair of scissors. The pair I have is linked here.
Have a different question that didn’t get answered in this post? Ask it in the comments below and I will be sure to get you an answer as soon as I can.
Dutch Door Inspiration
Last but certainly not least, I asked the Instagram community to share their Dutch Door Spreads with me and the Petite Planner audience. A number of very talented people offered to contribute.
As you’ll see in the coming images, the dutch door method above is not the only cut layout you can use. Feel free to experiment and have fun with your weekly spread.
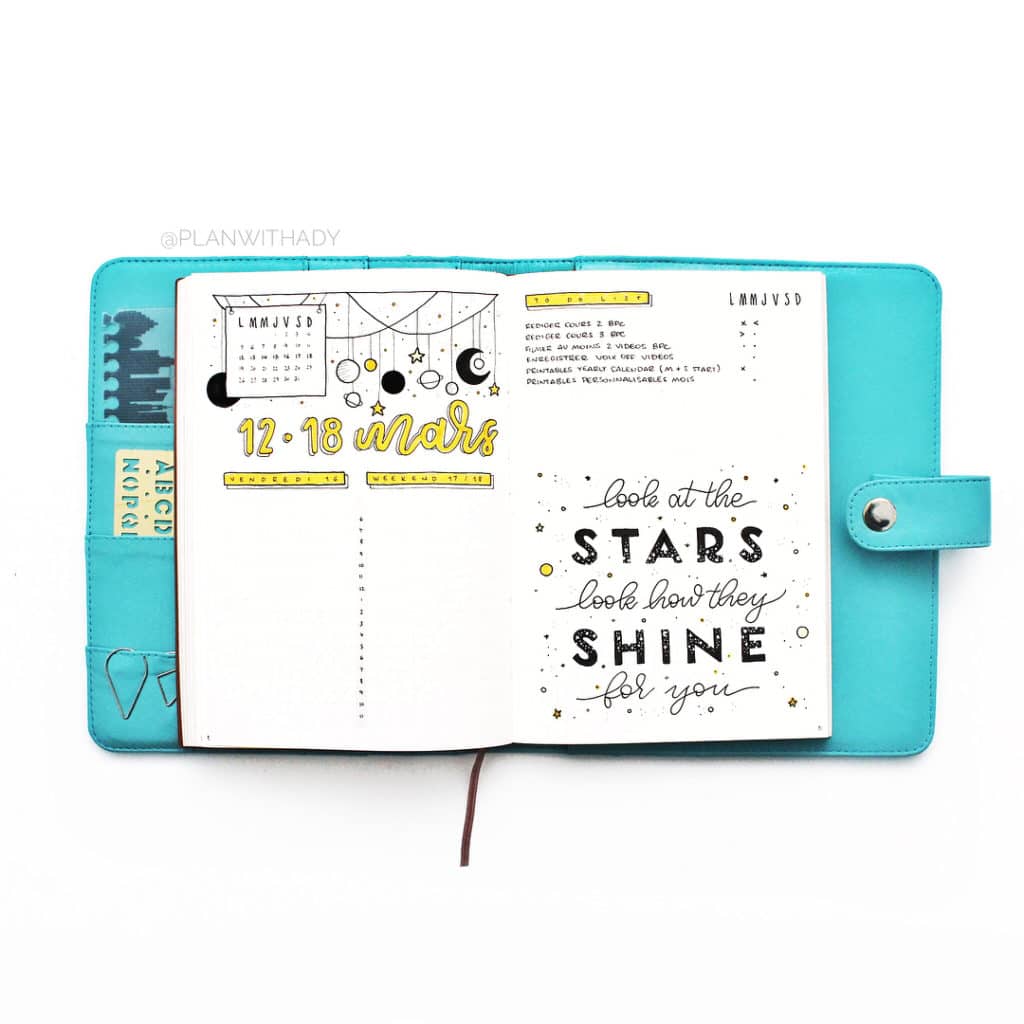
Photo Credit: @planwithady
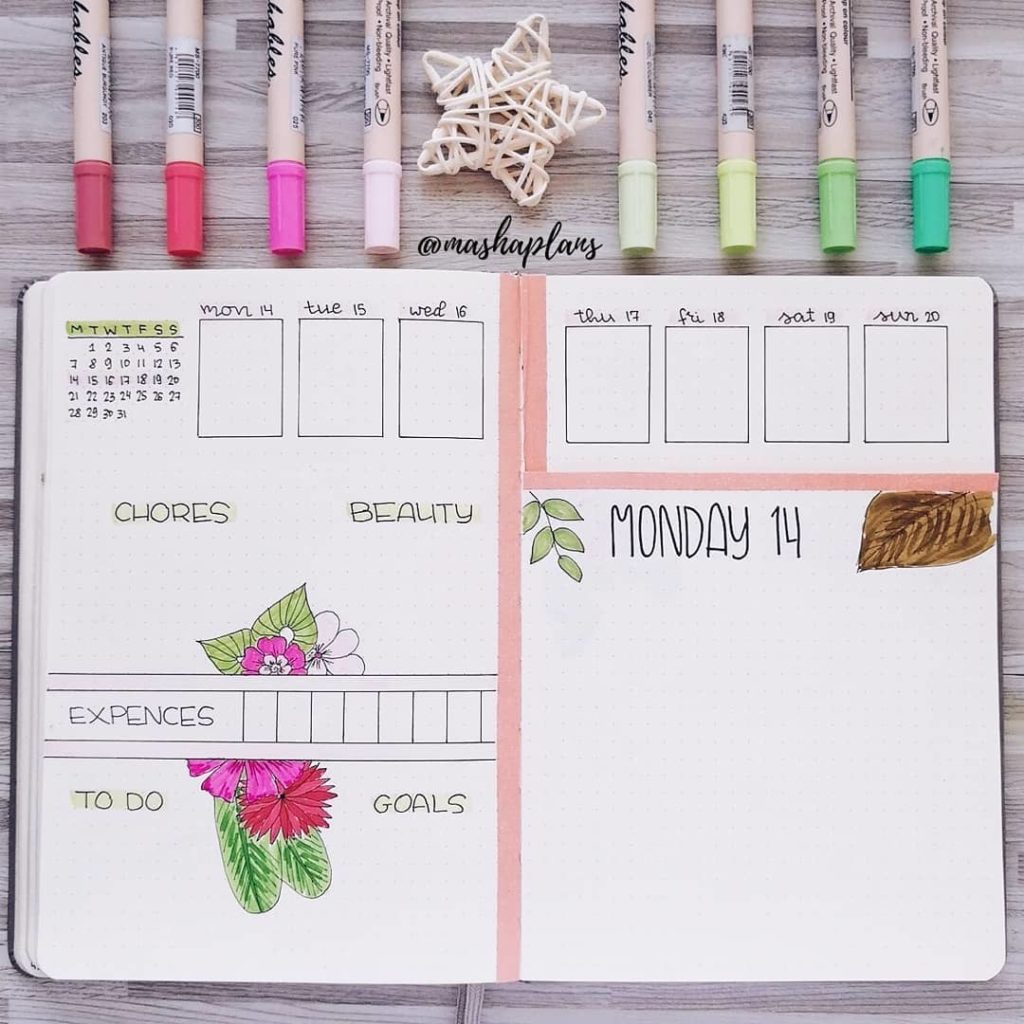
Photo Credit: @mashaplans
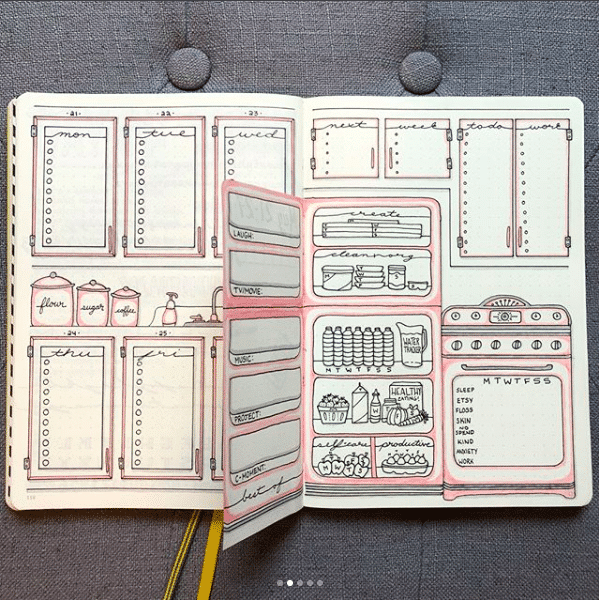
Photo Credit: @plansthatblossom
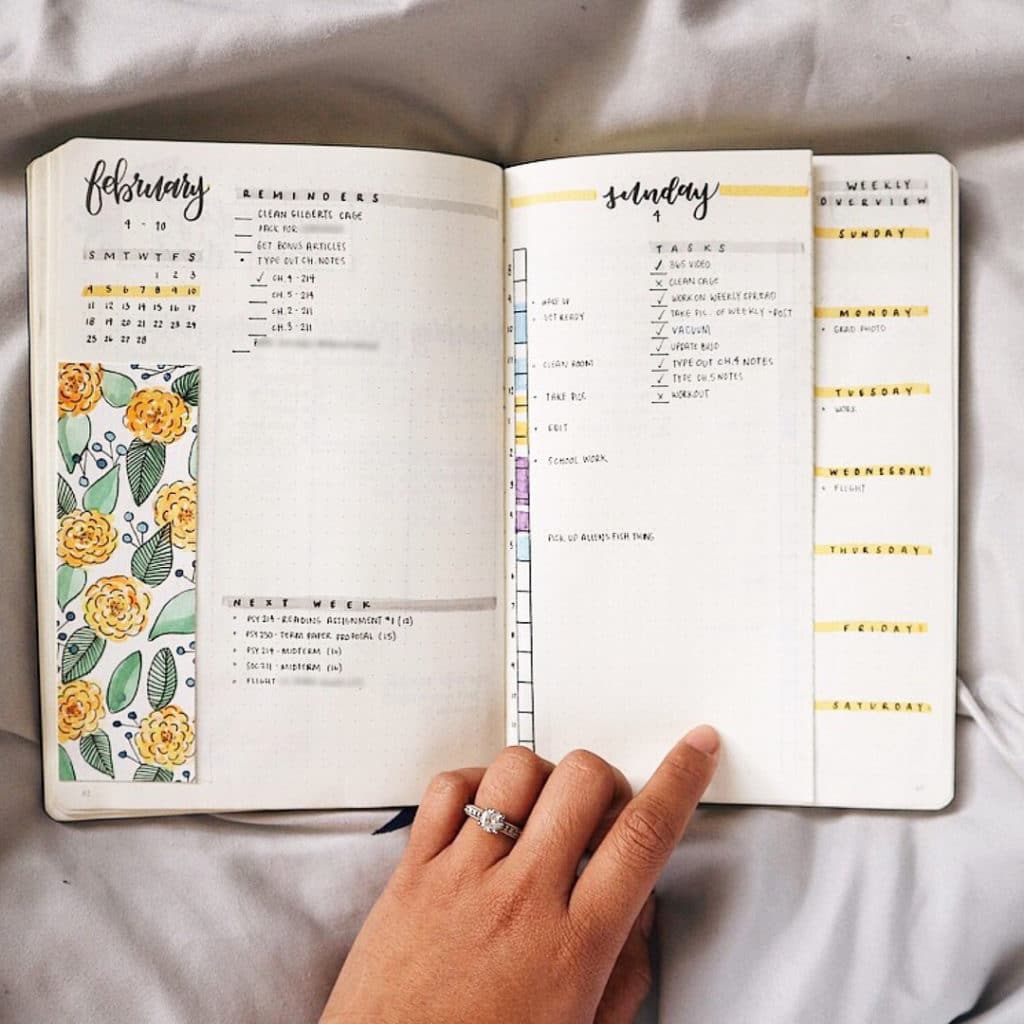
Photo Credit: @bulletby_r
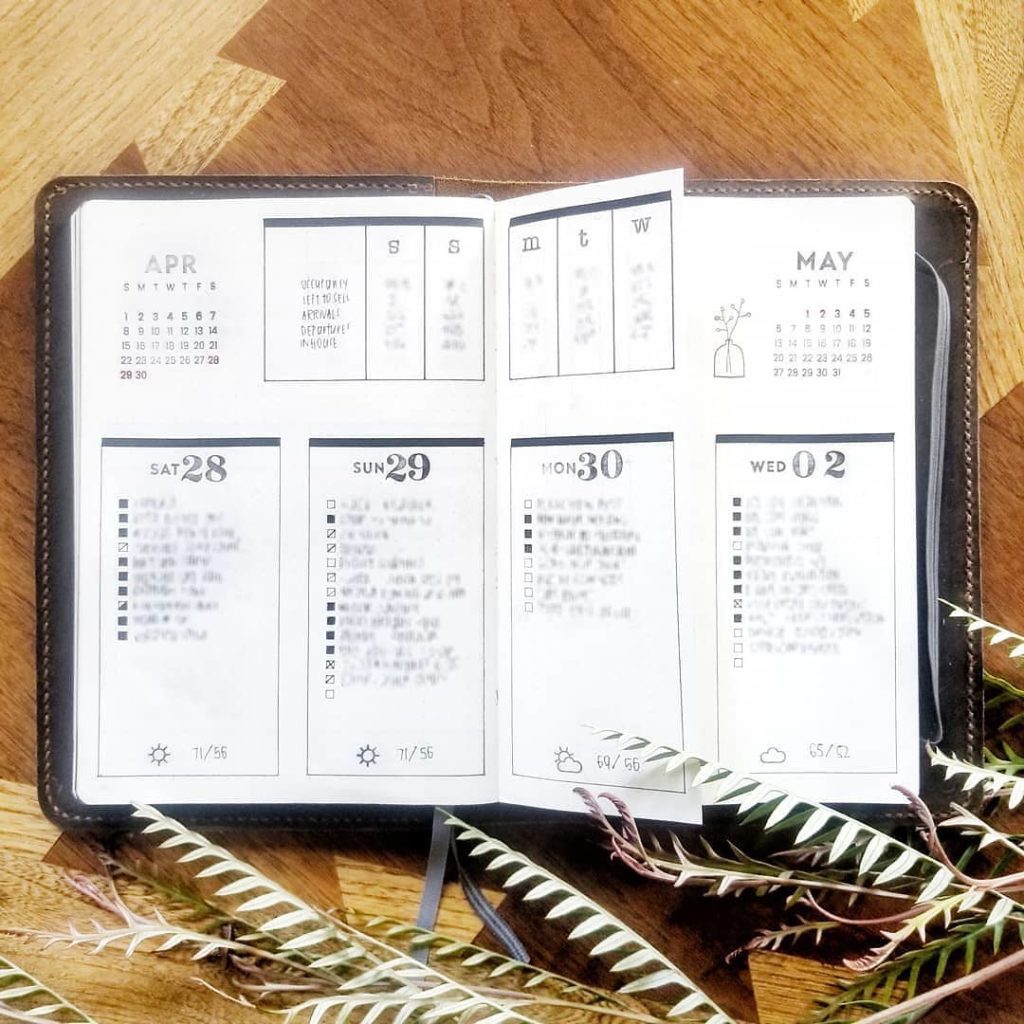
Photo Credit: @itsjuustbujo
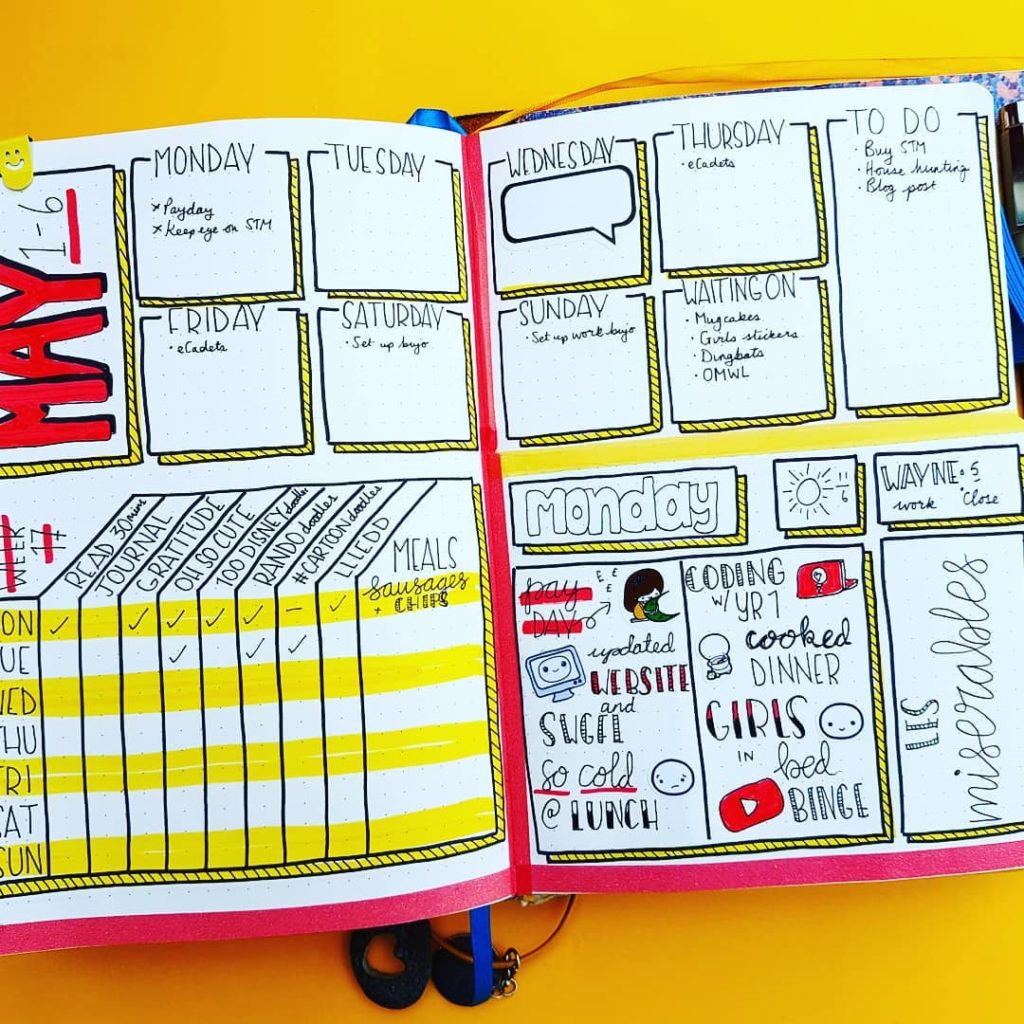
Photo Credit: @sj_bujo
Free Printable A5 Dutch Door Cut Template
Ok… seriously, this is the last thing. And it’s not necessary to create a dutch door. I just wanted to make the process a little easier for anyone who is on the fence about it.
This is specific to A5 size journals. To use it, first cut along the dotted line. Then, line up the bottom edge of the template with the bottom edge of your Monday page. Draw your pencil line above where the template ends. Then cut Monday-Saturday pages, leaving your title page and Sunday page untouched.
From here, you can also use the guidelines at the top to divide out your weekly overview. You will have a total of boxes per side using this template. This will allow you enough room for all 7 days of the week plus a place to put a header, or a box for the upcoming week.
Sign up below and you will get this instant download, plus you will get access to the VIP Resource Library, where I keep all of my printables.
It’s totally normal to be hesitant about making a spread like the dutch door. Some people might even think that cutting pages is equivalent to defiling their journal. My biggest advice is to take your time. Count and recount the pages you are going to cut.
If you have any questions before diving into this weekly spread, don’t hesitate to ask in the comments below, or by visiting my About page and sending me a message. I’m happy to help wherever I can.
Please share this post with your friends or your favorite bullet journal group on Facebook.