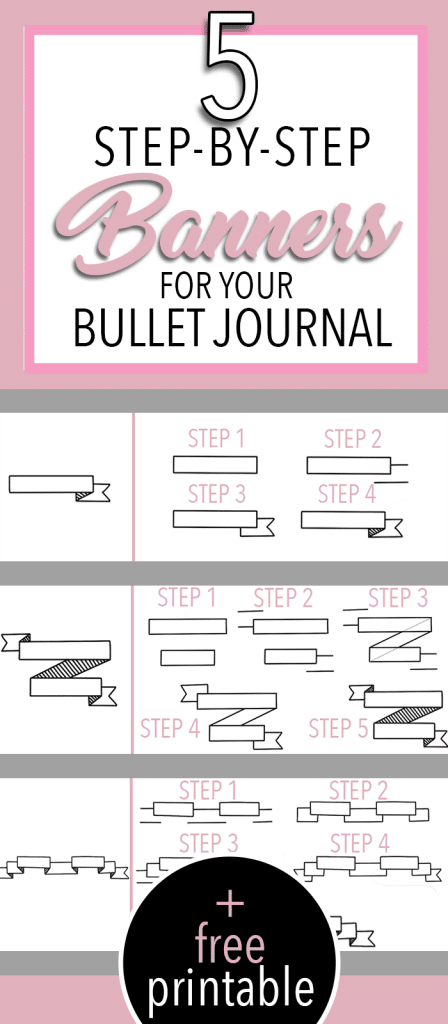
Learn how to draw simple banners for your bullet journal in this step-by-step photo tutorial. Use them for dates, collection, and tracker headers, or just as decoration.
This post may contain affiliate links. Please see my Disclosure for more information.
*UPDATED: 1/28/2019
Looking back at this post, I really am astonished and humbled by my progress. This was one of the very first posts on The Petite Planner–at that time, Bujos and Java.
But, because it’s been 2 years and my drawing skills and tutorial/teaching techniques have improved, I also wanted to update this post. Plus, if you stick around until the end, I made a free printable step-by-step banner drawing guide for you.
The original post (washed away into the internet landfill now) showcased six banners for your bullet journal. They were a mix of curly, wavy, back and forth banners. And at the time, they were my best work and I am not at all ashamed of them.
However, as time has progressed, I want to give you the best experience here on The Petite Planner. And that includes more structured tutorials that you can follow along and grow with.
With that, here are the major changes made to this post:
- There are now only 5 instead of 6 banners.
- All of the banners in the updated post are straight lines. I will be creating a second post that will be linked here to go into the more complex, wavy and spiral style banners. But for this post, I wanted to keep the tutorials beginner friendly.
- There is now a free printable included!
- Each banner section includes visual and written steps and tips to follow along with.
Beginner Friendly Banners for Your Bullet Journal
1). Basic Banner
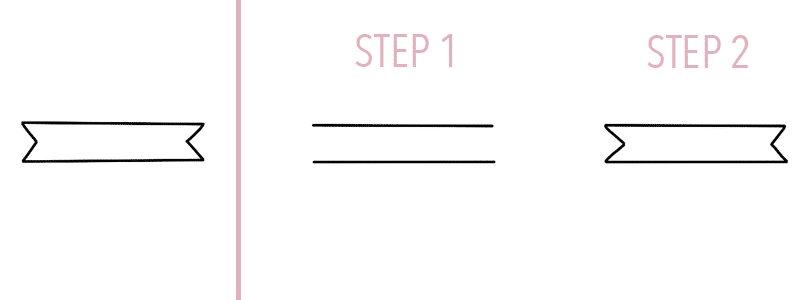
This is the most basic banner there is. Start with two horizontal parallel lines, taking into account how long your word or phrase inside the banner will be.
Then, draw your tail ends. In the photo, the tail is split, with an arrow shape pointing in. However, you could also reverse this shape to have arrows that point out from the ends of the banner. Or, you could create your own ends.
2). Single Fold Banner
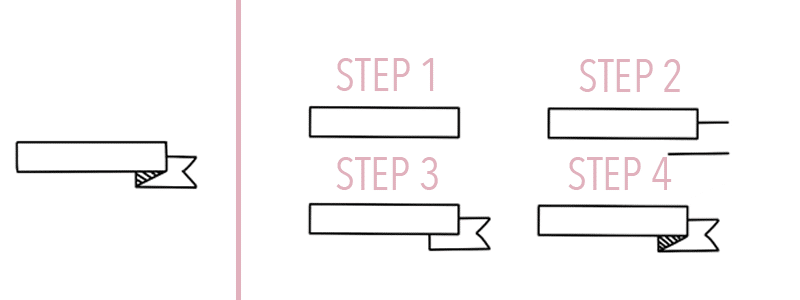
The number one concept you have to learn when drawing banners is the fold or crease. But once you learn how to do it, you can create any banner you want.
Start with a large rectangle where you will write your header. Then, choose one side to add an underturned fold and end. From that side, draw one horizontal line about halfway down the rectangle. Then, keeping in mind the width of your banner, draw a parallel line below that line, extending it a little ways further than the end of the rectangle.
Connect the lowest line to the rectangle with a short vertical line and then draw the tail end of your banner.
The last step is to create the fold in the banner. To do this, draw a diagonal line from the lower left corner of the lowest banner section to the lowest right corner of the higher banner. When you do this, it will create a small triangle shape.
To add depth and dimension, fill in the triangle with a line pattern or a solid color fill.
3). Multiple Fold Banner
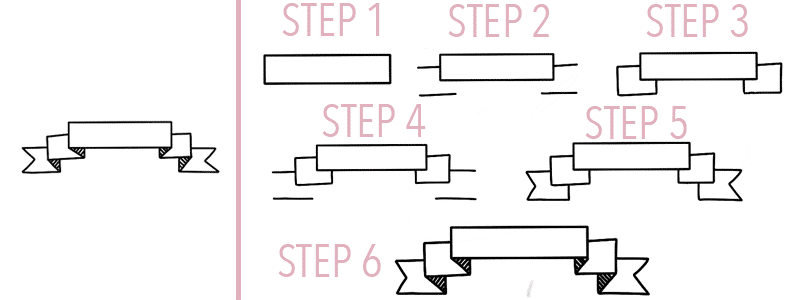
This banner may look complicated, but if you followed the steps for Banner #2, this one will be a breeze.
Just like before, start with your rectangle and then draw your parallel lines for the first dropped section of the banner. On this banner, do it on both sides.
Now, instead of adding your tail, you are going to connect your horizontal lines with vertical lines. It will resemble a smaller rectangle with the upper corner being hidden behind the main rectangular portion (see step 3).
Next, you will add the last dropped/folded section of your banner. Similarly to the step 2, draw your horizontal lines extending from the sides of the banner piece above. Again, keep in mind the width of your banner and try to keep it the same.
Now, draw a vertical line on each side to connect the lowest line to the folded banner above. Then add your tail.
Finally, just like in Banner #2, create the folds in the banner by drawing diagonal lines from the inside-bottom corner of the lowest banner section to the outermost bottom corner of the section above.
You will have a total of four folds for this banner. Fill them in with a pattern or solid color fill to add contrast and dimension.
4. Wrapped Banner
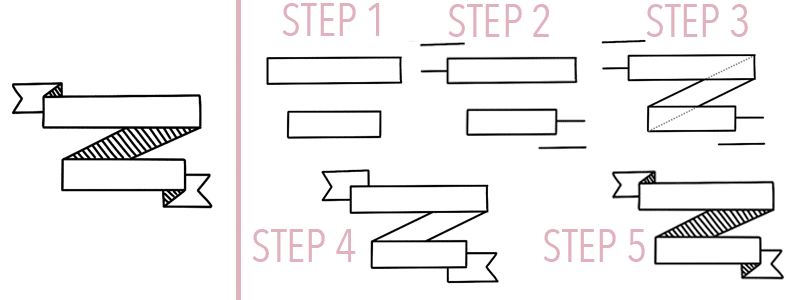
Now that you have worked on adding multiple folds in Bannens #2 and #3, we’re going to move on to this wrapped banner.
Start with a rectangle and then draw another rectangle that is slightly shorter below the other banner, leaving a gap roughly the width of your banner.
Draw your tail ends as you have in the previous banners above. For the top rectangle, draw your end above the banner. So, start with your horizontal line halfway down the rectangle and then draw your parallel line above the rectangle and extending a little way back behind it.
To create the connection between the two forward facing rectangular banner portions, you will want to start with pencil.
From the uppermost right hand corner of the top rectangle, use your pencil to draw a diagonal line connection to the uppermost left hand corner of the bottom rectangle. Now, draw another diagonal line from the lowermost right hand corner of the top rectangle to the bottommost left hand corner of the bottom rectangle, using your pencil.
Now, use your pen to trace over the lines where between the two rectangles. Then use an eraser to erase the pencil lines left inside the rectangles.
Finally, add your fold to the tails as you have done in the precious banners and then add a line pattern or solid color fill to add some dimension.
5). Two-Face Horizontal Banner
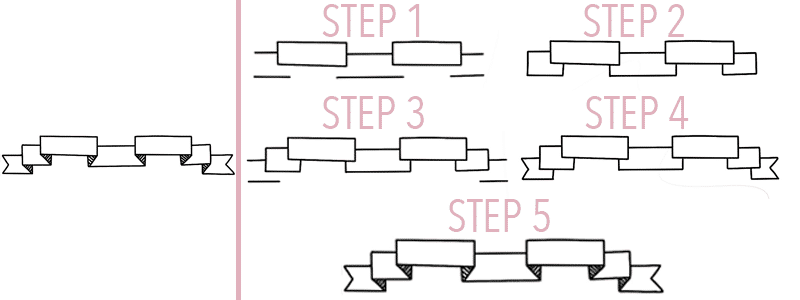
This is the final banner in this short doodle tutorial. And I saved the hardest for last.
By now, I believe that you have the lines down and have a good grasp on folds. So, don’t be intimidated by this 6-fold banner. You got it!
Start with two rectangles on the same horizontal plane, with a gap between the. Now, just as you have done, you are going to add your horizontal lines for the tails.
For the center connection, about halfway down the height of your rectangle draw a horizontal line that connects the two rectangles. This is a dropped/folded piece of the banner. So, for the bottom line, which falls below the two rectangles, you need to extend that line out a little past the end of each rectangle. This gives you enough room to put a fold on each side.
Then, follow the same steps you took in the Multiple Fold Banner (#3) to create the ends of your banner.
And finally, you will add in all of your fold by connecting the dropped sections to the next section above it with a diagonal line. If you are confused at all, go back up to Banner #3 to try the folds.
You will have a total of six folds in this banner. Two on each end of the banner and then two in the middle, connecting the lower middle dropped portion.
Free Banner Practice Printable
As I revamped this post, I realized how great the need was for a printable practice sheet.
This printable includes all of the banners and steps shown in this post, as well as space for you to practice on your own.
Print this out on a plain piece of US Letter Size Paper as many times as you need to practice. I just ask that you don’t redistribute it or try to profit off of it.
Simply fill out the form below to get your printable immediately. You will be added to my list of subscribers. I send out about one email a week with updates, news, exclusive freebies, and coupons for my printable shop. And You’ll gain access to the VIP Resource Library which is where all of my free printables are housed. Pretty sweet tradeoff, right?
I hope this banner drawing tutorial has helped you to feel more confident when creating headers and doodle decorations for your bullet journal. In the near future, I will be sharing another banner tutorial for more complex banners, so be sure to connect with me on social to keep up to date on new posts–all of my links are below my signature and in the top menu of my site.