
It common to feel like you’re lacking creativity or the abilities to create Instagram worthy pages. Let me help you with these 5 easy hacks to add creativity to your bullet journal… even if you aren’t creative.

*This post may contain affiliate links. Please see my Disclosure for more information.
Not everyone wants an artsy bullet journal, but after over a year of running this blog and responding to emails, I’ve found a commonality. Most people are drawn to the bullet journal system for its flexibility and ability to be whatever you want it to be. You can draw, paint, letter, use stickers, and stamps. The world is in your hands when you sit down with your bullet journal.
But, often, people write me with doubt and insecurity. They look through Instagram and instantly decide that they can’t possibly make monthly layouts with intricate lettering or drawings. These emails are always hard for me to read and respond to because I tend to be overly encouraging and supportive. And sometimes people are too frustrated to listen to my advice.
But, I always do my best to make them see other options and work towards improving their skills. There are tons of easy hacks to add creativity to your bullet journal. In this post, I will go over 5 of those that you can start today, regardless of your skill level.
5 Easy Hacks to Add Creativity to Your Bullet Journal
Tracing
Lettering is one of the most valued skills in the bullet journal community. Everyone wants to learn it, but it can be very challenging and in turn, very frustrating. Bloggers, myself included, recommend products like Tombow Dual Brush Pens

But, there’s also the concern about price and spending money. Both of those pen options cost money, but not everyone has that option. That doesn’t mean you can’t add brush lettering to your bullet journal.
This easy bullet journal hack is fairly quick and doesn’t require anything out of the ordinary to do. You simply find or write a quote or word in a word document on your computer or tablet with a brush font your like, then print it out and transfer it with a pencil.
Step-by-Step How to Trace Brush Lettering:
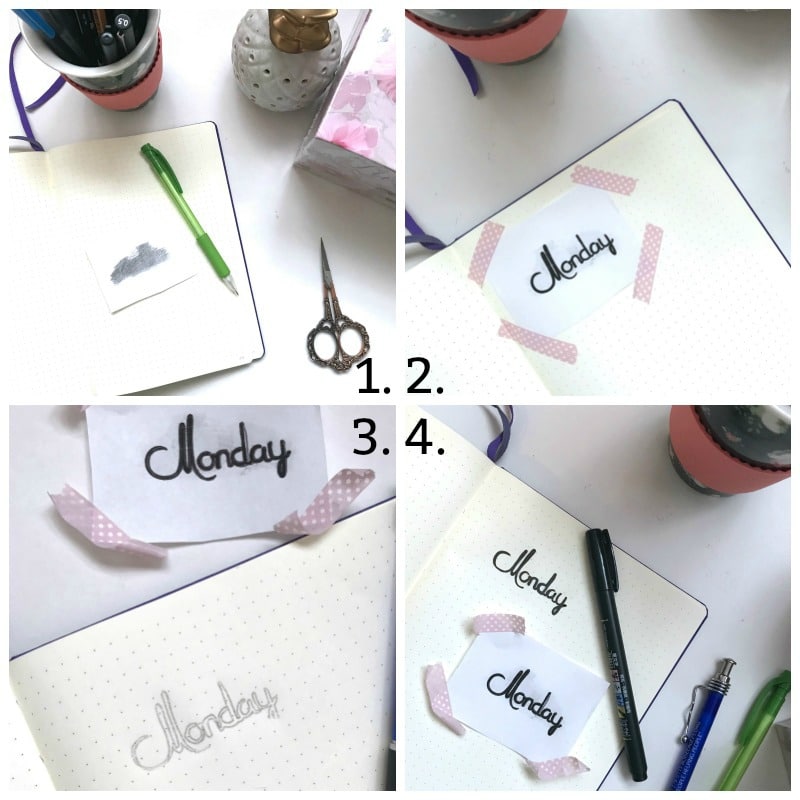
- Find a brush lettering font you like. You can use dafont.com to find and download your font. After you download it, you open the file, find the text file inside, and install it by clicking the install font button.
- Then, go into your word document and type out the word or quote you want to transfer into your journal. Make sure it’s the right size for whatever you are using it for.
- Print out your words on regular paper and cut the words out leaving about 1″ of white paper all the way around.
- Flip your paper over so the words are facing down. Then, use a pencil to lay down the graphite all over the back of the word you want to transfer. Just scribble it on there.
- Then, flip the paper back over, placing it on top of your journal, wherever you want your word to go on your page. It helps to use washi tape to hold your paper in place.
- Next, carefully use a ballpoint pen to trace over the letters. Use heavy pressure when you do this.
- When you’re done, peel up your tape and paper to reveal a pencil tracing of your word. Now you can use a marker or a pen to fill in the lettering.
- Voila! Now you have professional looking brush lettering in your journal.
Use Common Items as Stencils
Think I’m crazy yet? Well, I might be… a little. But, I’m the good kind of crazy and I’m offering you solid advice here. If you can use your imagination, you can use just about any small to medium size item as a stencil, and create really cool patterns, borders, and decoration with just a pen and a common item.
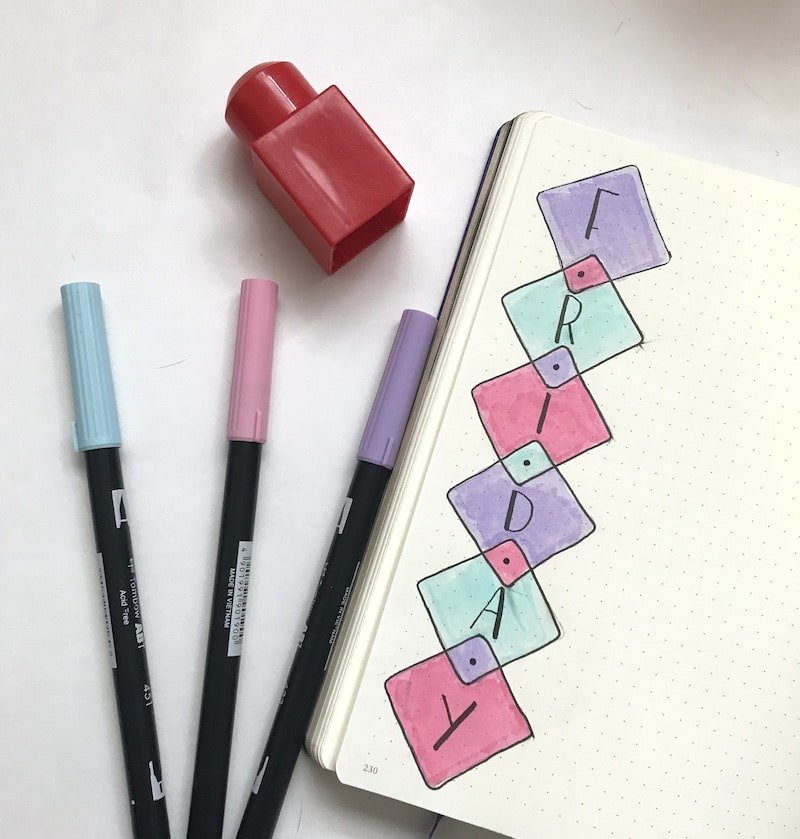
In this first image, I’m using one of the big building blocks that many children have. While I was tracing this block to the create this geometric pattern, I realized the square block would also be great to use to make the boxes in a monthly spread.
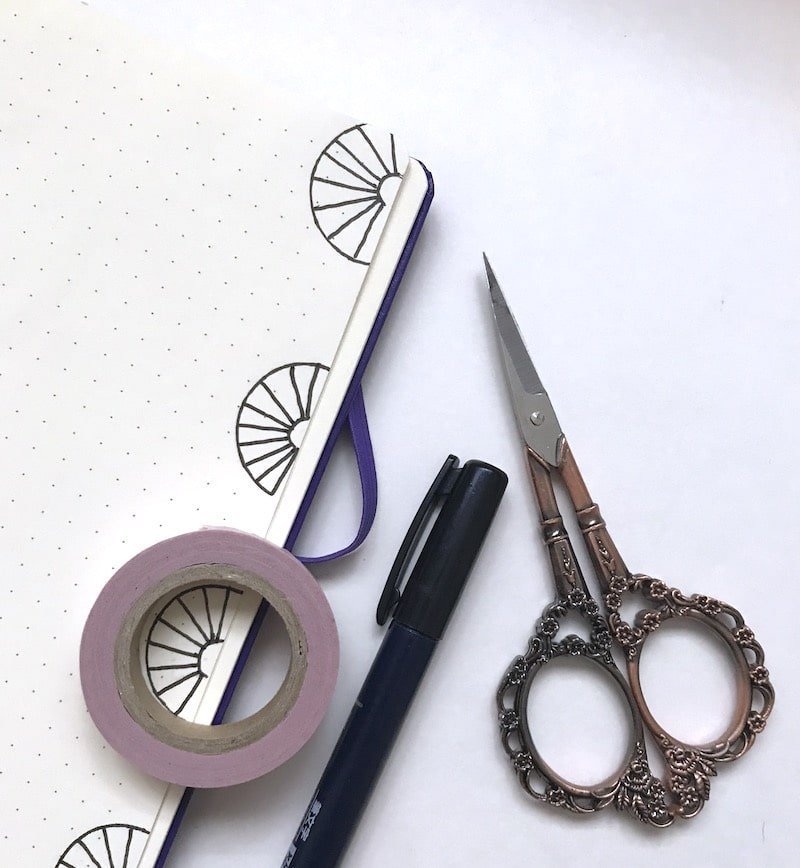
In the second image, I traced around the inside of a roll of washi tape to create a half-circle page border. You could also use a shot glass, a can of soda, or the bottom of a measuring cup.
Look around your house and see what you can find to trace. Kids’ toys are usually pretty promising.
Breaking it Down
I’m not talking about dance here. This isn’t necessarily a hack as it is a real piece of doodling advice. Call me a bit egotistical, but I consider myself a damn-good doodler. And I have it pretty well down to a science.
Most doodles can be broken down into basic shapes: circles, ovals, squares, rectangles, triangles, dots, lines, and blobs. If you can train your brain to see images or items as shapes, you can doodle just about anything you want.
Think of doodling a pine tree. What shapes can it be broken down into?
It could be broken down into one triangle for the top of the tree and then a small rectangle for the stump. Or you could stack multiple triangles on top of one another with a rectangle at the bottom for the stump. You can start by sketching out these basic shapes in pencil and then using your black pen to refine the shapes and make them more realistic.
This can be done with just about any doodle. Some doodles will require more refining of shapes than others. When I say refining, I mean adding curved corners to rectangles or bringing the lines of a square in at an angle. If you think of a leaf, it could be broken down into an oval with a triangle top. See the image below to get an idea. You can further define this leaf with jagged edges or you can leave them smooth and add in the veins and stem.
Make Your Own Planner Stickers
It’s so easy to overlook this bullet journal hack. But, it’s one of the easiest things you can do to add a creative touch to your journal without spending money. You don’t need to buy stickers, stamps, etc. If you have a computer and a printer, you can make your own stickers at home for next to nothing.
There are literally an unlimited number of sticker creations you can make. Add floral elements, weekly headers, banners, checklist stickers, and anything else you can dream up. You don’t need any special design programs or prior knowledge of graphic design to create stickers. You can find free images and vectors on websites like Pixabay and Canva to create your own stickers. There are a couple methods you can use to do this.
Method #1:
The first method is the most budget-friendly option. You find images or text you want to make into stickers and add them to a word document. Then, print the document on plain paper and use a pair of scissors to cut out each individual sticker. Use a glue stick or tape adhesive
Method #2:
Using the same method above, add your images or text to a word document. Then, instead of using plain sticker paper, add full sheet label paper
Method #3:
The last method requires you to have a Cricut

With this method, you add your .png or .svg image files to the design space. From there, you choose print and cut. Then, print your image on sticker paper
Take a Course in Creativity
Skip all the research and self-teaching. Fast track your progress with a crash course in creativity. And hey, guess what?
We have an online creative journaling course!
It’s jam-packed full of hands-on video tutorials in:
- Creative confidence
- Simple lettering
- Doodling
- And layout ideas
This course is my heart’s work. I worked over 120 hours of time, effort, and many tears into this project because I truly believe it can change the way people look at their journals. Over 200 people pre-enrolled in this course over a span of 2 weeks.
I know that sticking to and being consistent with your bullet journal can make you more productive, help you relax, and be organized. It’s also an incredible place for you to adventure with your creativity. I owe almost all of my creative skills to starting and maintaining a bullet journal.
So, if it’s something you’re serious about doing and sticking to, this course can help you fall in love with your journal. On top of the content, you will be invited to a private Facebook group full of encouraging and supportive individuals from all over the world. If you are struggling with something, chances are someone else is too. And this group gives you the perfect place to connect with those people. PLUS, I go Live with new exclusive tutorials and tips every week.
Invest in yourself and in your future. If you think about it, your bullet journal could be the key to achieving your goals and being exactly where you imagine yourself in 10 years.
If you are interested in enrolling and have stuck with me through this entire post, I want to give you a coupon code so you can get the course at a discounted price. Use code: INVEST5 at checkout. This coupon will knock $5 off the enrollment price when you make your purchase.
Enroll Now!
Tell me in the comments below what bullet journal hacks you have used to add creativity to your bullet journal.
